
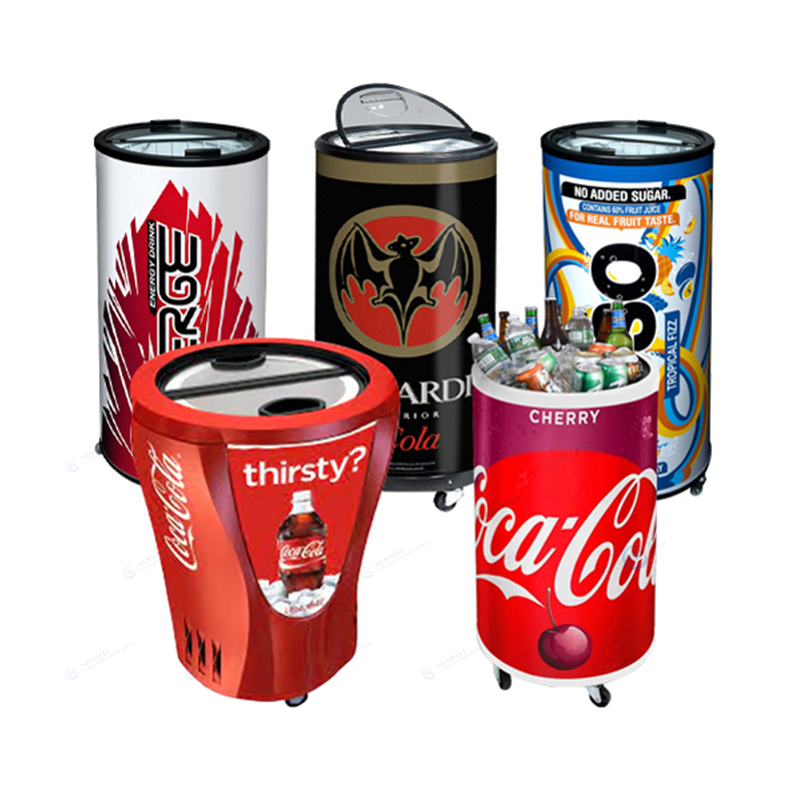
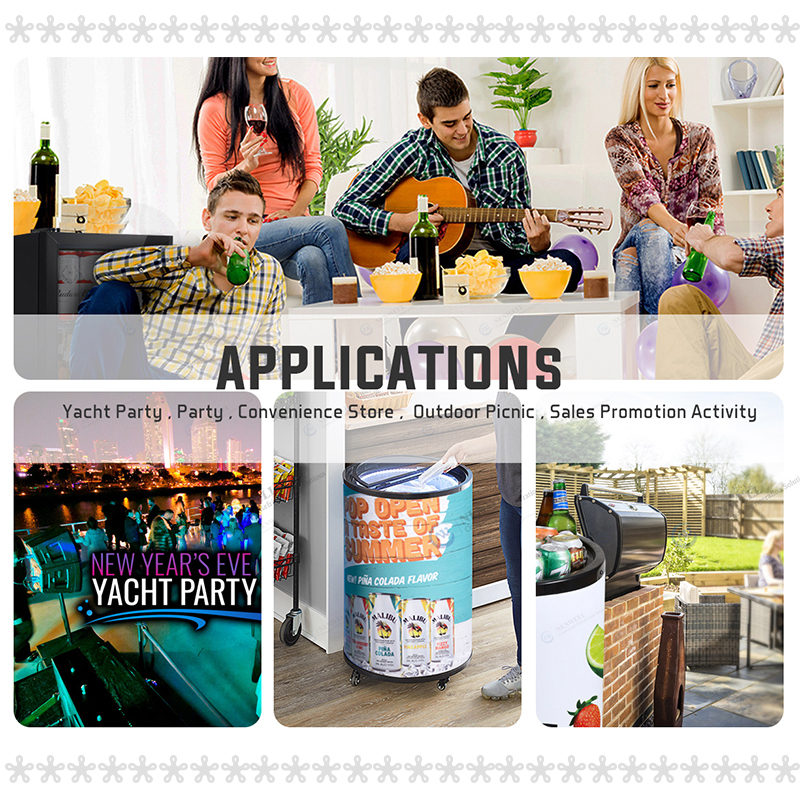
The barrel – shaped display cabinet equipment refers to the beverage refrigerated cabinet(Can cooler). Its circular arc structure breaks the stereotype of traditional right – angled display cabinets. Whether in a mall counter, home display, or exhibition site, it can attract attention with its smooth lines. This design not only needs to take into account aesthetics but also achieve a balance between functionality and practicality. The following will detail the complete design steps of the barrel – shaped display cabinet from the preliminary preparation to the final implementation.
I. Core Preparations before Design
Before starting to draw the drawings, sufficient preparatory work can avoid repeated modifications later and ensure that the design plan not only meets the actual needs but also has practical feasibility. This requires collecting the user’s needs, determining that the feasible needs can achieve a 100% completion rate, and deciding on the plan through discussions between both parties.
(1) Precise Positioning of the Display Target
The display target directly determines the structural and functional design of the barrel – shaped display cabinet. First, clarify that the type of display is beverages, so emphasis should be placed on the appearance and refrigeration function design. Consider installing a compressor at the bottom of the cabinet, and focus on planning the layer height and load – bearing capacity. For example, each layer should reserve more than 30 cm in height to have more storage space. It is recommended to use a metal material to reinforce the bottom frame.
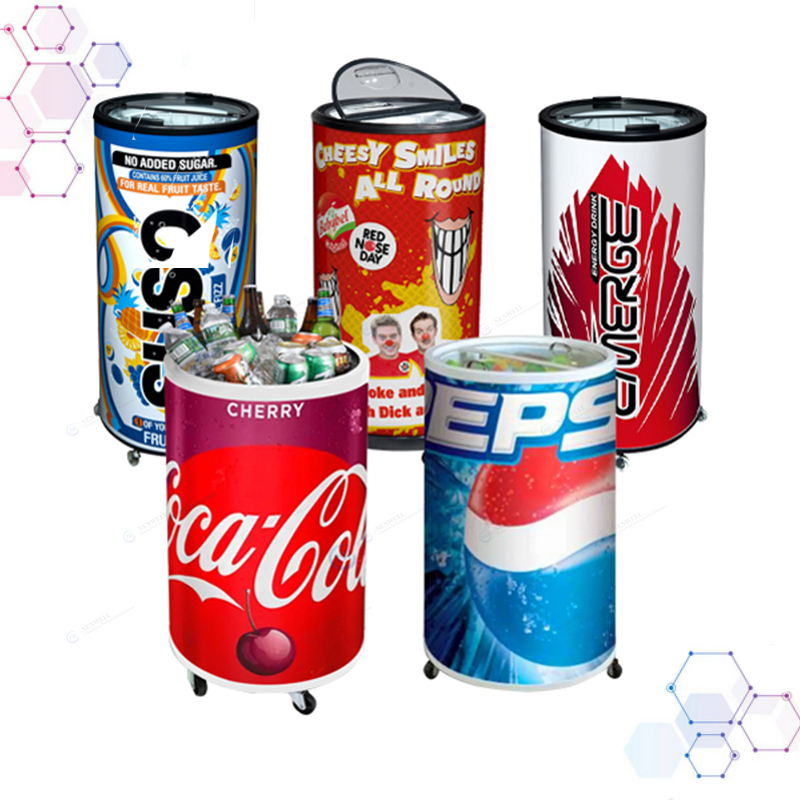
Secondly, determine the nature of the display scene. The barrel – shaped display cabinet in a mall counter needs to take into account both the brand’s tone and the flow of people. The diameter is recommended to be controlled between 0.8 – 1.2 meters to avoid being too large. In terms of style, it should be unified with the beverage style. For example, the common Coke – style can directly represent its use for beverages. When used temporarily at a party, it needs to be light and easy to carry. Prefer low – cost materials such as density boards and PVC stickers, and the overall weight should not exceed 30 kg for easy transportation and assembly.
(2) Collection of Reference Cases and Limiting Conditions
Excellent cases can provide inspiration for the design, but they need to be improved in combination with one’s own needs. For example, the cylindrical display cabinet adopts a double – layer acrylic structure, and a programmable LED light strip is installed on the outer layer to highlight the texture through changes in light and shadow.
At the same time, clarify the limiting conditions of the design. In terms of spatial dimensions, measure the length, width, and height of the installation position, especially the dimensions of internal components such as motors and compressors to avoid over – sized or under – sized assembly. In terms of budget, mainly divide the proportion of material costs and processing fees. For example, the material cost of a high – end display cabinet accounts for about 60% (such as acrylic and metal), and that of a mid – end display cabinet can be controlled at 40%. In terms of process feasibility, consult the equipment capabilities of local processing plants in advance. For example, check whether processes such as curved surface hot – bending and laser cutting can be achieved. If the local technology is limited, simplify the design details, such as changing the overall arc into a multi – segment spliced arc.
II. Core Design Steps: Gradual Deepening from Form to Details
The design should follow the logic of “from the whole to the part”, gradually refining elements such as form, structure, and materials to ensure that each link is operable.
(1) Overall Form and Dimension Design
The overall form design includes dimensions. Generally, according to the user’s needs, for the user, it is necessary to clarify the overall size, mainly in terms of capacity and refrigeration efficiency. As for the size of the internal compressor and the space to be reserved at the bottom, these are matters for the factory to handle. Of course, the supplier should also pay attention to whether the user’s dimensions are standard. For example, if the overall size is small but a large capacity is required, it may lead to the inability to assemble internal components due to a lack of suitable types.
(2) Internal Structure Design
The internal design needs to take into account both space utilization and usage logic. Generally, the designed depth will not exceed 1 meter. If the depth is too large, it is not convenient to use; if it is too small, the capacity will decrease. When it exceeds 1 meter, users need to bend over and reach out excessively to pick up and place items in the deep part, and may even find it difficult to reach, which violates the “usage logic” and results in a design with available space but inconvenient use. When it is less than 1 meter, although it is convenient to pick up and place items, the vertical extension of the space is insufficient, directly reducing the overall capacity and affecting the “space utilization”.


(3) Material Selection and Matching
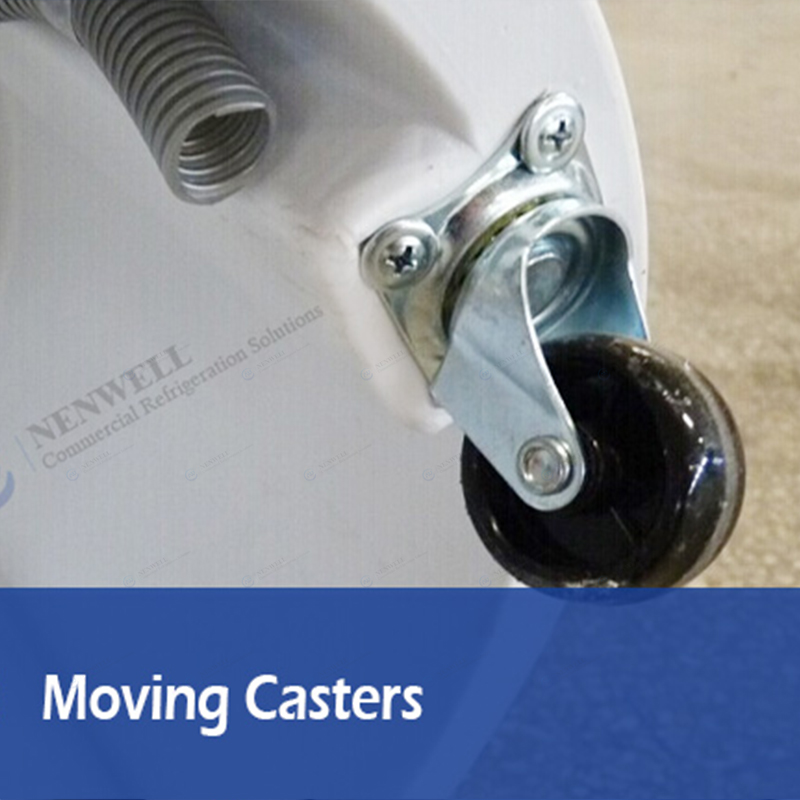
The selection of materials needs to balance the three elements of aesthetics, durability, and cost. In terms of main materials, stainless steel is mainly used for the production of the outer contour panel, food – grade plastic is used for the inner liner, and rubber is used for the bottom casters, which has strong load – bearing capacity.
(4) Embedded Design of Functional Components
Functional components can enhance the practicality and display effect of the barrel – shaped display cabinet. The lighting system is one of the core components. It is recommended to install an LED light strip at the bottom of the surface partition. There are multiple color temperature options, such as 3000K warm white light, which highlights the metallic texture and is also suitable for 5000K cold white light to restore the true color of the product. The light strip should use a low – voltage power supply (12V), and a switch and dimmer knob should be reserved for easy control of brightness.
Special functions need to be planned in advance. For example, if a liquid crystal temperature controller is needed, it should be installed at an appropriate position at the bottom. At the same time, an installation space for the constant – temperature equipment should be reserved, and ventilation holes should be opened on the side panel to ensure air circulation.
(5) Exterior Decoration Design
The exterior design needs to be unified with the style of the displayed items. In terms of color matching, it is recommended that brand display cabinets adopt the brand’s VI color system. For example, the Coca – Cola display cabinet can choose red – and – white color matching, and the Starbucks display cabinet takes green as the main color. Detail treatment can improve the overall quality. The edges should be rounded to avoid sharp – angle collisions, and the radius of the rounded corners should not be less than 5mm. The joints should be kept flat, and decorative lines can be added for the connection between metal and wood for transition. Hidden feet can be installed at the bottom, which is not only convenient for adjusting the height (to adapt to uneven ground) but also can prevent the ground from getting damp. In addition, the brand logo can be added at an appropriate position, such as laser – engraved on the side or pasted with acrylic three – dimensional characters to enhance brand recognition.
(6) 3D Modeling and Drawing Output
3D modeling can visually present the design effect. Software such as SketchUp or 3ds Max is recommended. When modeling, draw in a 1:1 ratio, including every component of the cabinet, such as side panels, shelves, glass, light strips, etc., and assign materials and colors to simulate the real visual effect. After completion, renderings from multiple angles should be generated, including the front view, side view, top view, and internal structure perspective view, which is convenient for communication with the processing factory.
Construction drawings are the key to implementation. They should include three – view drawings (elevation view, cross – section view, plan view) and detail node drawings. The elevation view should mark the overall height, diameter, arc and other dimensions; the cross – section view shows the internal layered structure, material thickness, and connection methods; the plan view marks the position and dimensions of each component. The detail node drawings need to magnify and display key parts, such as the connection between the glass and the frame, the fixation of the shelf and the side panel, the installation method of the light strip, etc., and mark the material name, thickness, and screw model (such as M4 self – tapping screws).
(7) Cost Accounting and Adjustment
Cost accounting is an important part of budget control and needs to be calculated separately according to material usage and processing fees. The material cost can be estimated according to the developed area. For example, for a barrel – shaped display cabinet with a diameter of 1 meter and a height of 1.5 meters, the developed area of the side panel is about 4.7 square meters, and the area of the shelf is about 2.5 square meters. Calculated at 1000 yuan per square meter of acrylic, the main material cost is about 7200 yuan. The processing fees, including cutting, hot – bending, assembly, etc., account for about 30% – 50% of the material cost, that is, 2160 – 3600 yuan, and the total cost is about 9360 – 10800 yuan.
If the budget is exceeded, the cost can be adjusted by optimizing the design: replace some of the acrylic with tempered glass (cost reduction of 40%), reduce complex arc processing (change to straight – edge splicing), and simplify decorative details (such as canceling the metal edge). However, it should be noted that the core functions should not be compromised, such as the material thickness of the load – bearing structure and the safety of the lighting system, to avoid affecting the use effect.
III. Post – design Optimization: Ensuring the Implementation Effect and Practicality
After completing the design plan, it is necessary to solve potential problems through sample testing and process adaptation adjustment to ensure that the final product meets expectations.
(1) Sample Testing and Adjustment
Making a 1:1 small sample is an effective way to verify the design. Focus on testing the following aspects: Dimension adaptability, put the displayed items into the small sample to check whether the shelf height and spacing are appropriate. For example, whether wine bottles can stand upright and whether cosmetic boxes can be placed stably; Structural stability, gently push the small sample to test whether it shakes and whether the shelf deforms after bearing weight (the allowable error does not exceed 2mm); Functional coordination, test whether the light brightness is uniform, whether the rotating parts are smooth, and whether the glass opening and closing are convenient.
Adjust the design according to the test results. For example, when the load – bearing capacity of the shelf is insufficient, metal brackets can be added or thicker plates can be replaced; when there are shadows in the light, the position of the light strip can be adjusted or a reflector can be added; if the rotation is stuck, the bearing model needs to be replaced. The small – sample test should be carried out at least 2 – 3 times. After ensuring that all problems are solved, then enter the mass – production stage.
(2) Process Adaptation and Localized Adjustment
If the processing factory feedbacks that some processes are difficult to achieve, the design needs to be adjusted flexibly. For example, when there is a shortage of curved – surface hot – bending equipment, the overall arc can be changed into 3 – 4 straight – plate splices, and each section is transitioned with an arc – shaped edge – banding strip, which not only reduces the difficulty but also maintains a round feeling. When the cost of laser engraving is too high, silk – screen printing or stickers can be used instead, which is suitable for display cabinets in mass production.
At the same time, consider the convenience of transportation and installation. Large – scale display cabinets need to be designed as detachable structures. For example, the side panel and the base are connected by buckles, and the shelves are packaged separately, and the on – site assembly time is controlled within 1 hour. For overweight display cabinets (exceeding 50 kg), forklift holes should be reserved at the bottom or universal wheels should be installed for easy movement and positioning.
IV. Design Differences in Different Scenes: Targeted Optimization Plans
The design of the barrel – shaped display cabinet needs to be fine – tuned according to the characteristics of the scene. The following are the optimization points for common scenes:
The display cabinet in a mall pop – up store needs to highlight the “rapid iteration” feature. The design cycle is controlled within 7 days. Modular components are selected for materials (such as standard – size acrylic boards and reusable metal frames), and the installation method adopts tool – free splicing (buckles, Velcro). Magnetic posters can be pasted on the surface of the display cabinet for easy theme replacement.
The museum cultural relic display cabinet needs to focus on “protection and safety”. The cabinet body uses anti – ultraviolet glass (filtering 99% of ultraviolet rays), and an internal constant – temperature and humidity system is installed (temperature 18 – 22℃, humidity 50% – 60%). Structurally, anti – theft locks and vibration alarm devices are used, and the bottom is fixed to the ground (to avoid tipping), and a hidden passage for cultural relic extraction is reserved.
The home – customized display cabinet needs to emphasize “integration”. Before design, measure the indoor space size to ensure that the gap between the display cabinet and the wall and furniture does not exceed 3mm. The color should be coordinated with the main indoor color (such as the same color system as the sofa). Functionally, it can be combined with storage needs. For example, drawers can be designed at the bottom to store sundries, and bookshelves can be added to the side to display books, achieving the dual functions of “display + practicality”.
V. Frequently Asked Questions: Avoiding Pitfalls
Is the barrel – shaped display cabinet easy to tip over?
As long as the design is reasonable, it can be avoided. The key is to lower the center of gravity: use materials with a higher density at the bottom (such as a metal base), and the weight proportion should not be less than 40% of the overall; control the ratio of the diameter to the height within 1:1.5 (for example, if the diameter is 1 meter, the height should not exceed 1.5 meters); if necessary, install a fixing device at the bottom (such as expansion screws fixed to the ground).
Is the curved glass easy to break?
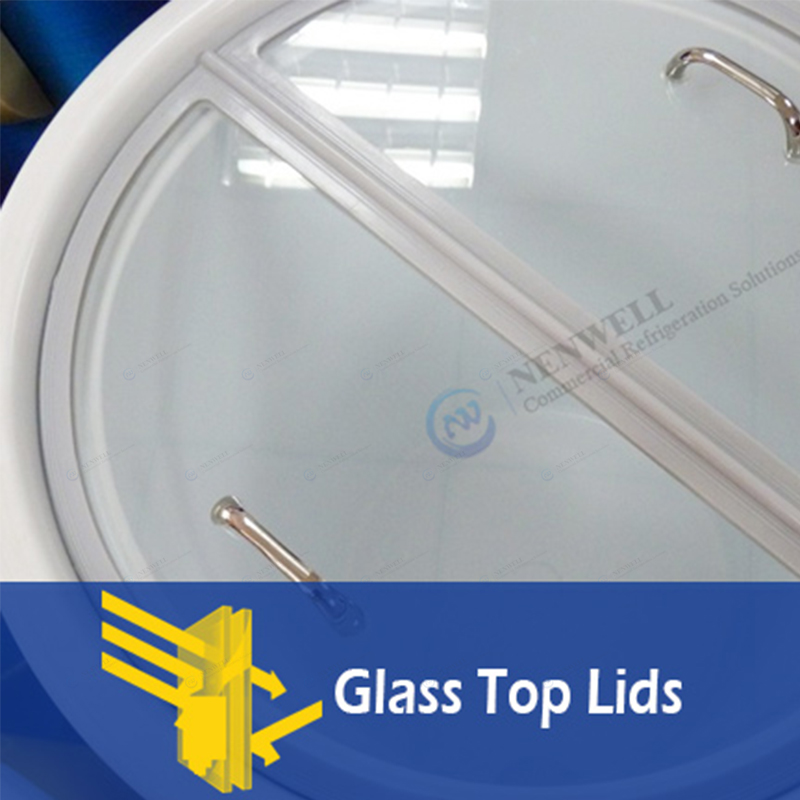
Choose tempered glass with a thickness of more than 8mm. Its impact resistance is 3 times that of ordinary glass, and after breaking, it presents obtuse – angle particles, which is safer. When installing, leave a 2mm expansion joint between the glass and the frame (to avoid breakage due to temperature changes), and the edges should be ground to reduce stress concentration.
Can small factories make barrel – shaped display cabinets?
Yes, just simplify the process: use multi – layer boards instead of acrylic (easier to cut), splice arcs with wooden strips (instead of the hot – bending process), and choose finished light strips for the lighting system (no need for customization). Local woodworking workshops usually have these capabilities, and the cost is about 30% lower than that of large factories, which is suitable for small – and medium – batch production.
The above is the content of this issue. I hope it will be helpful to you. In the next issue, more detailed interpretations of different types of display cabinets will be shared.
Post time: Aug-06-2025 Views: